Wednesday, September 24, 2014

SLR vs Compact (Fixed Lens) cameras


SLR Cameras:
Advantages:

·         Normally better image quality which stands out indoor or in low light compared to small compact cameras
·         Provides to ability to control Depth of Field (or selective focusing) to keep certain things in focus everything else out of focus. The kit lens are limited in this capability but you can achieve greater control with fast or wide aperture lenses.
·         You can change lenses and use many accessories like external flash, remote control, filters, extension tubes, macro tubes etc.
·         Better build, better life.
·         Normally they offer lot of manual controls
Issues:
·         Bulky and difficult to carry around
·         Normally expensive. Accessories like lenses etc can also cost significant money.
·         In good light or in outdoor use, there is not much advantage unless filters are used.
Compact Cameras:
Advantages:

·         They are cheaper.
·         Easy to carry around. Compact in size.
·         You can get tremendous zoom up to 60x in some of the cameras. This comes vary handy in outdoor photos and in travel. It is difficult to get this kind of zoom in SLR cameras.
·         In outdoor, good light, they are as good as any camera. They work great in landscape cameras or in situations where you want most things in the scene in focus.
·         Compact cameras offer macro shots. In macro mode, camera can focus on things very close to camera. To get similar ability in an expensive SLR, you will need a dedicated Macro lens. By nature, compact cameras offer great macro photography.
Issues:
·         Many models do not offer enough manual controls
·         They struggle in low light or in indoor photography
·         Don’t have options to use many accessories like different lenses, filters, external flash etc.

·         It is difficult to achieve bokeh or background blur with small sensors and tiny lenses.

Camera comparison iPhone5 vs iPhone6

Looks like in Auto mode (without any setting), iPhone5 and iPhone6 have more or less very similar picture quality. One noticeable difference is that iPhone6 camera is more wide angle.
Here is a photo taken with iPhone5:
Photo with iPhone5
 Here is a photo with new iPhone6

Photo with iPhone6
Besides being wide angle, looks like iPhone6 lets you control exposure right on the screen. Tap the screen and a metering circle will come up with a + sign. Touch it and it it will let us increase or decrease the exposure. The cool part is you will be able to see the impact of it live on the screen so you can decide which exposure level to use.
If you have just iPhone5, don't worry. You can still set us exposure by touching various parts of the screen. Touch a darker object/part in the screen to make the photo brighter or touch a brighter spot on the screen to make the whole photo darker. For details, please see my last post.

Thursday, September 18, 2014

Better Photos With Any Smartphone Camera

Smartphone cameras are more prevalent and more popular than dedicated cameras these day. There are two main reasons. Most of us have a smartphone with us most of the time and this results in an always-available camera. The second reason is that the smartphone cameras are getting better in capabilities. They generally have respectable 8MP resolution and they do pretty good job for day-to-day photography in good natural light.

As you have noticed, most smartphones are fully automatic in nature. They don’t let you do manual focusing or select aperture, shutter speed or ISO. Thy generally have just one or two controls. They generally let you select Flash. Other than that, there is nothing else you can do.

Advantages of phone cameras:
·         Easy to use.
·         Always Available: We have them with us almost all the time. There is no need to carry an extra gear!
·         Shortest response time: Compared to a typical camera which you have to take out of the bag, turn on, focus and shoot, a phone camera is always on and you can take a photo in a fraction of a moment.
·         Offers Auto-backup: In your traditional camera, your SD card can go bad or can get lost but most camera phones automatically backup photos in cloud storage.
·         HDR and Panorama: Unlike traditional cameras, most smartphone cameras these days offer HDR and Panorama shots. With HDR, you can easily take day light, high-contrast photos with more details than a regular capture. The Panorama offers you to take wide angle shots very conveniently.
·         Wide Angle photos: Most phone cameras are naturally wide angle so you can cover more without needing to change a lens.
·         Macro photography: Smartphone cameras are great for good light macrophotography. No need for a macro lens or changing any settings.

Issues with camera phones:
·         Not many controls available. You can’t do much if you don’t like the shot your camera takes.
·         Tiny sensors and tiny lenses limit your ability in low light or indoors. Many times your photo may look better in iPhone’s retina display or Samsung’s bright LCD screens but viewing them on a standard computer monitor or an HDTV, you will see the issues.
·         If you print camera phone photos, most of them may not look as good as photos taken with a dedicated camera.
·         Flash. Most phone cameras have a flash but I think their flash is more of an issue than an advantage. Their Flash is a tiny LED which most of the time will wash out your subjects in photos.


How to take better photos with a smartphone camera?
1.      For taking photos of the landscapes, turn on HDR and take some phones with HDR too.
2.      Many times for landscapes, use Panorama feature to make your landscape photos look even better.

3.      Enable your phone camera to take photos with touching the screen. This is one powerful way to take better photos with your smartphone. When you touch, camera focuses on that particular subject. This way you can control the focus in your camera. The 
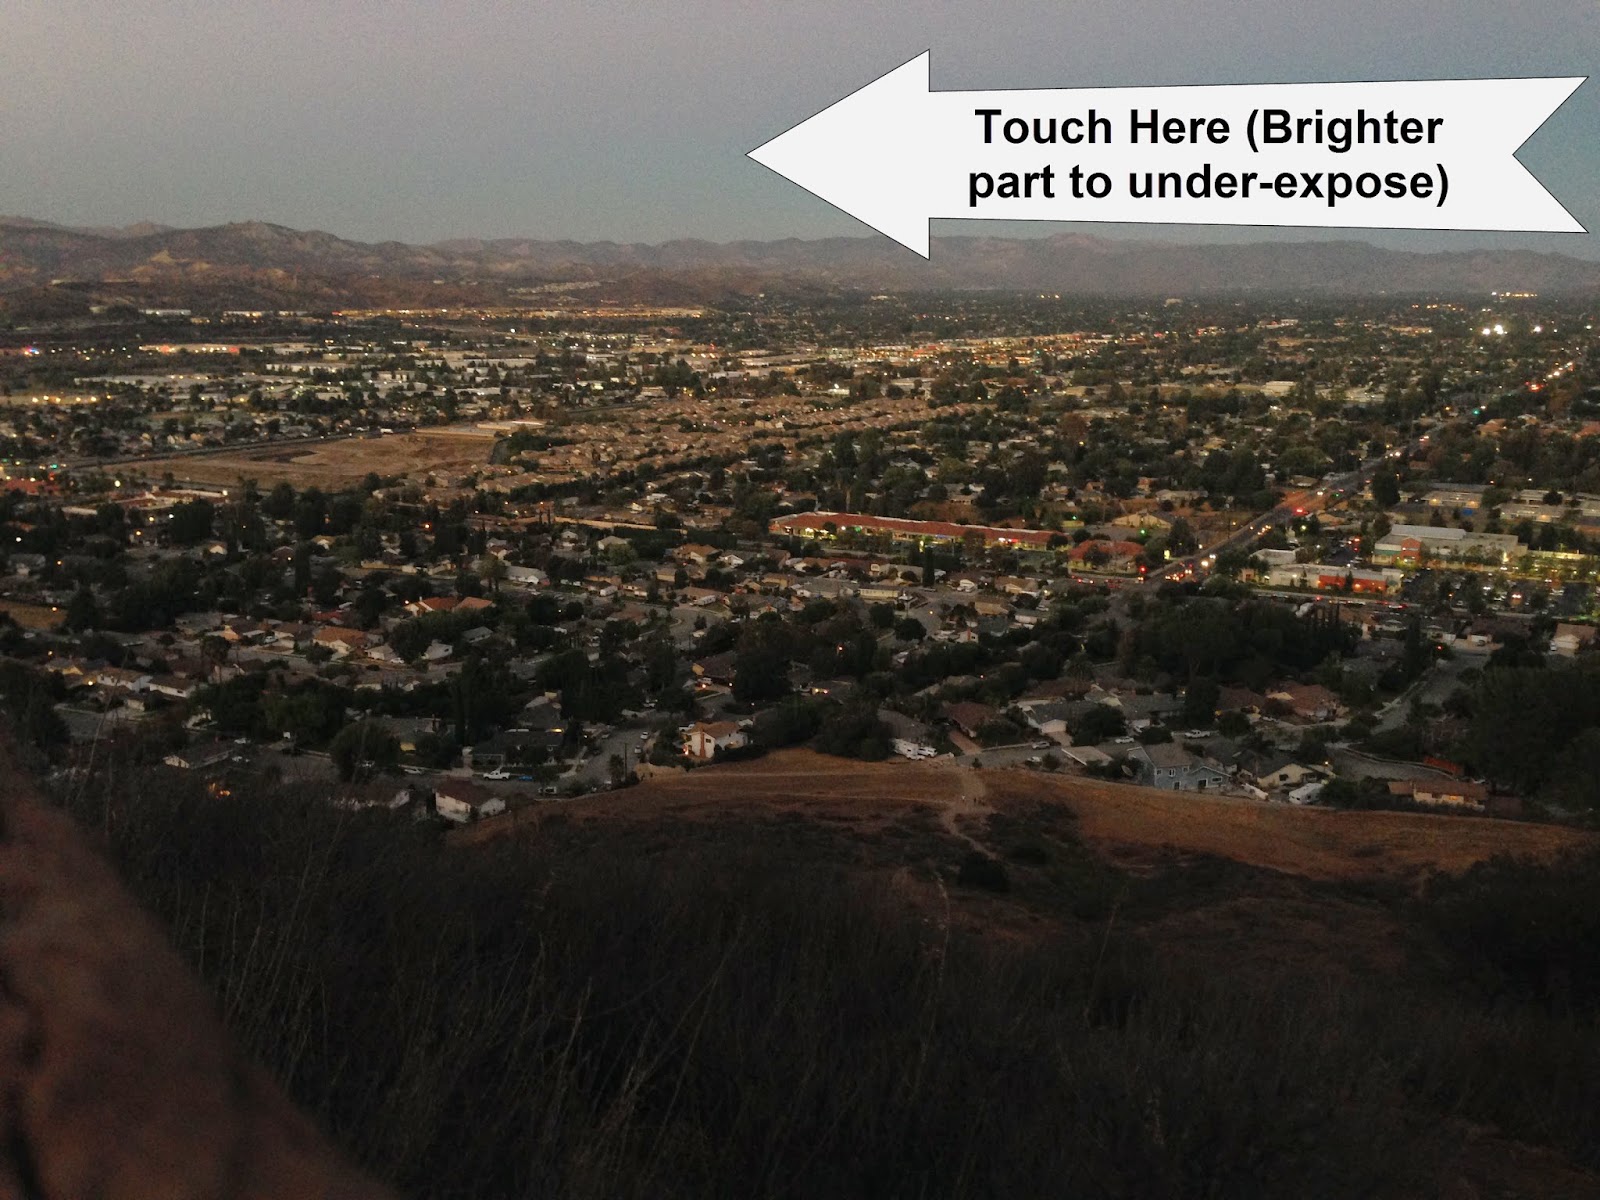
area you touch also tells camera to expose based on the light in that area. If you touch a dark area in your frame, your smartphone will think that the scene in front of it is dark so it will take in good deal of light. This can result in more details but some parts getting washed out. On the other hand, if you touch some brighter area, the phone will think that the scene is too bright so it will take in less light. This will result in an under-exposed darker photo.

Here is an example. On my hike, I took a photo of Simi Valley, CA in Auto mode (I mean just pressing the Capture- Shutter Release button):


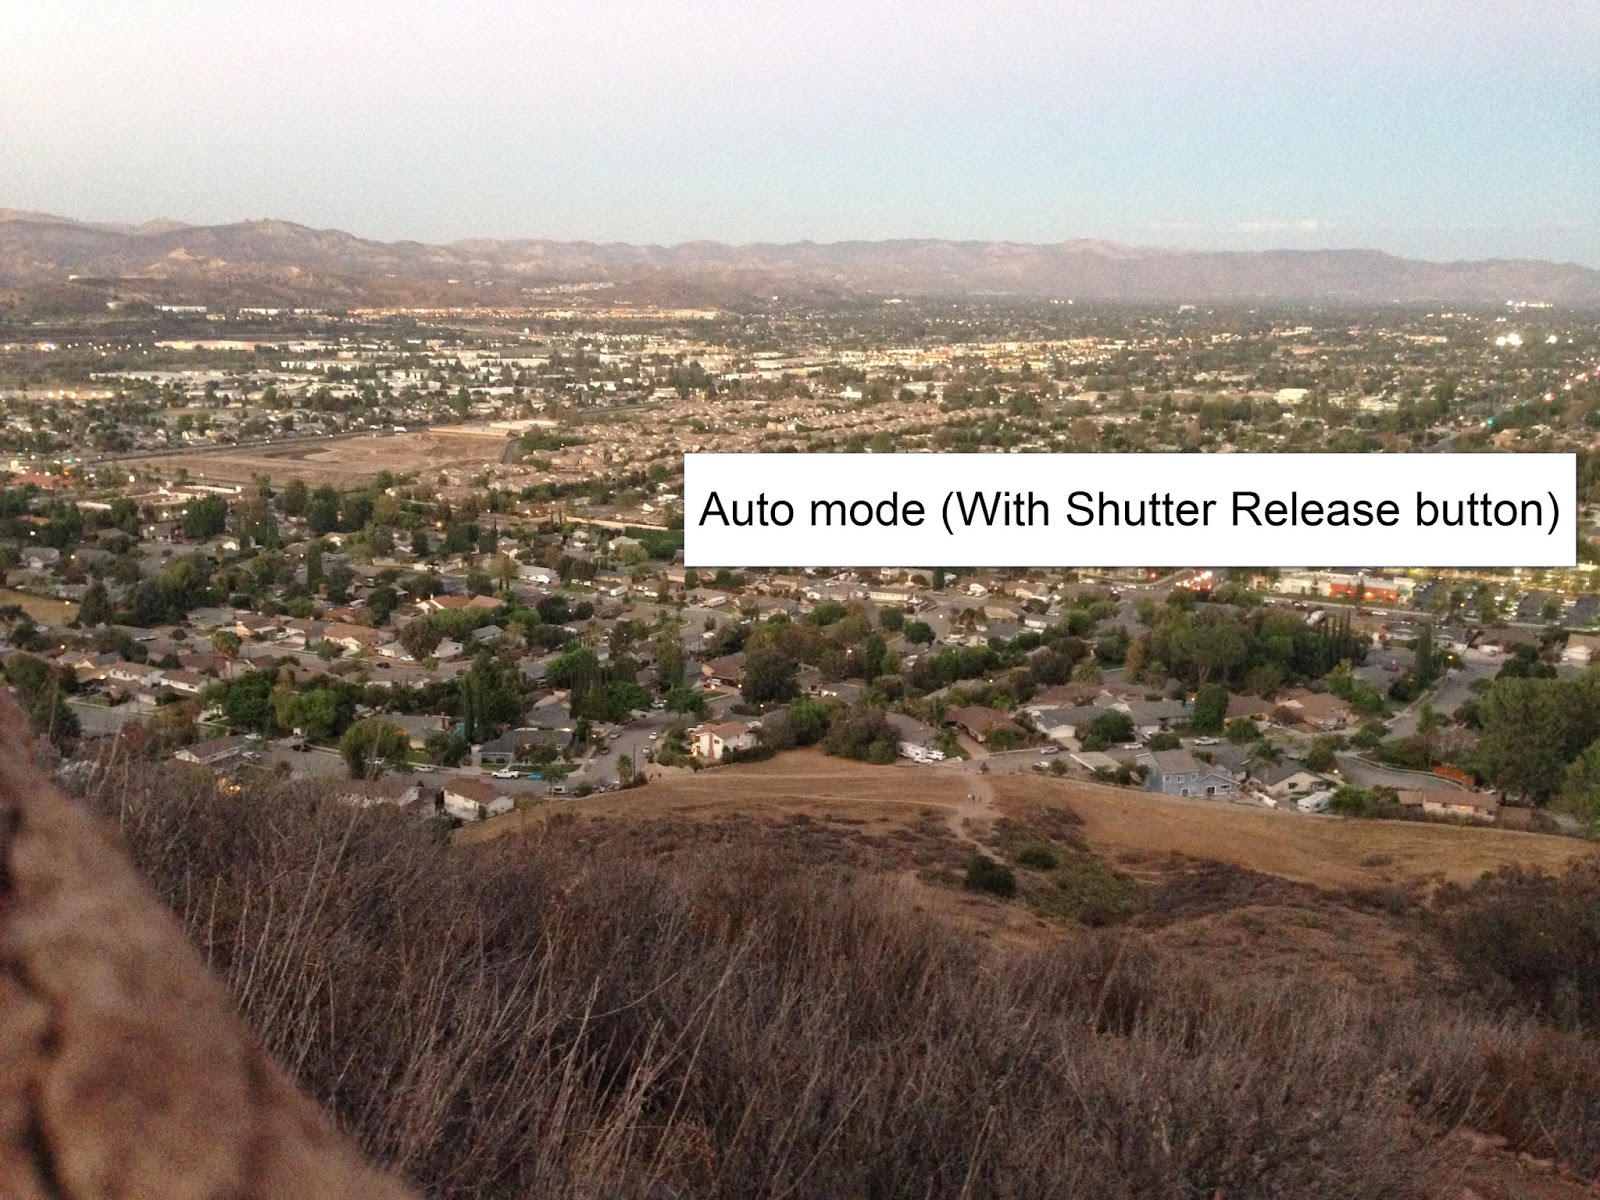
Now if I wanted to get better sky colors, I would need to tell my iPhone to take in less light. To achieve this, I touched the sky in the frame. Here is a photo which captures the sky colors well:


Now if I want to over expose the phone, I would touch the darkest part (most towards the bottom of the frame). Here is a photo with much more light in. It has much more details but the sky is washed out:

If you are reading this article on a bright table or a phone, you may not see the variance in light but on an IPS monitor (or in reality), all 3 photos have different exposure/light. Also, I am not telling you which photo is better here but I am trying to show you that you can control the light intake or exposure with a smartphone camera even though there may be no button there.

Wednesday, September 3, 2014

Want to take beautiful photos of waterfalls?

Want to take beautiful photos of waterfalls? Do you like that milky/silky smooth effect in waterfall photos? You can take such photos too, in most situations, with most cameras. It is not difficult. However in following cases it becomes a sort of challenge.
* Most smartphones or fully point and shoot cameras in many situations will not be able to take such photos. You need a camera that offers some manual controls.
* If you are looking at the waterfall in broad day light, many cameras may run into limitations. In a sort of low light, you are in good luck.

During my tour of Big Island, Hawaii, I came across some waterfalls. After some trial and errors, I was able to take some nice photos with a FujiFilm point and shoot camera.

The first photo I took in auto mode did not take a photo with the silky feel. So changed the camera to Tv/Shutter priority mode and made some adjustments. In few minutes, I was able to take nice photos.

Here are some tips for you.
* It is important that you have a tripod. If you don't have one, find a flat surface where you can put your camera. I didn't have a tripod either but I was able to find a place to put my camera. Many times, I use the strap and put it under the camera to create the angle I need. Takes some time to figure out but if you are lazy like me and don't want to carry a tripod, , this is a small cost. In my experience, in 80-90% of the situations, I am able to find a flat surface to put the camera on.
* Set the camera to Timer mode- 2 seconds or 10 seconds delayed mode. This helps eliminate the shake due to pressing of the shutter release button.
* Change the mode dial to Tv or S mode- Shutter Priority. Set the shutter speed to around .5 second or so. Then if needed, you can change it to 1 second or reduce it to .25 seconds or so.
* Set ISO to 100. If your camera lets  you set the ISO, set it to 100 or the lowest value.

You are all set. Take a photo and see if it comes out well. If the effect is not strong, you can slow down the shutter speed. Let the shutter stay open a bit longer. If the photo comes a bit washed out, you need to reduce the light. To reduce the light, keep the shutter open for less time. In other words, make it faster. As we are shooting in Tv or S mode, camera will choose the Aperture value for us. If you are a bit advanced user, you can shoot in M or Manual exposure mode. Start with Shutter-speed of .5 seconds, f 8 or so and ISO 100. Then as needed, change the values.
If you are shooting in broad light, your photos are likely to be washed out with such a long exposure. One solution to reduce the light is to use ND Neutral Density filter. This filter is like sunglasses or a tinted film. This can help you shoot with longer exposure without getting your photos washed out. In case if you don't have the filter, you can try to put your sunglasses in front of the camera (make sure you clean them) to reduce the light getting on the sensor.
Try this out and let me know if this helps. As I keep saying, if you help your camera, your camera will help you take nice photos. Also, you can take good photos with almost any camera in most of the situations.
Happy shooting.
Here is one more photo I took on that day on the Big Island.
Waterfall, Big Island, Hawaii


Tuesday, September 2, 2014

Want to take photos of stars? Here are some tips.

During my recent visit of Big Island, Hawaii, I was at the Volcano park one evening. As it started getting dark, the sky started filling up with stars. I was busy shooting the red flames of lava and suddenly noticed the stars above me. Unfortunately, I was running out of time as my family wanted to go find a place to eat. I tried to take few shots but I had no luck. Taking good photos of the star-filled sky is a difficult job. Expensive equipment does have an advantage here. An iphone or a compact camera can not help you take nice photos of the sky. An SLR with a kit lens can help you to some extent but a Full Frame camera with an expensive/fast lens can help you a lot.
The next day, I was visiting Mauna Kea and had decided to try to take some photos of stars. I googled to get some tips for astro-photography to make it easy. Then I brought along few lenses and tripod with me. As it started getting dark, there were even more stars than the previous night. It was cold but I was determined to try my best. After some trial and error, I was able to take some decent photos.


If you also want to try to take photos of the sky at night time, here are some tips:
  • Pick your best/most expensive camera. Bigger the sensor, better it will be.
  • For lens, try to pick a wide-angle lens which is also a fast lens. I know it is difficult to find a wide angle lens which has also a wide open aperture. I didn't have such a lens so I used the kit lens of my Pentax K-30. In some photos, I also used a cheap Fish-eye lens (8mm Rokinon)
  • Focus the camera to infinity. If you lens has the distance marking, just move it to infinity. Then change the Camera from Auto-Focus (AF) to Manual Focus (MF). Make sure the focus ring does not move. If you have a tape, just tape the focus ring to lens body so you don't lose focus ;)
  • If you camera has Long Exposure Noise Reduction, turn it off.
  • Set camera to Manual exposure mode. In the manual exposure, you will need to set ISO, Aperture and Shutter-speed.
  • Set ISO to 3200 or even 6400. 
  • Set Aperture to the most wide open value you can get. 
  • Set the lens to the most wide angle (lowest mm value). As I had a kit lens, the lowest I could go on 18-55mm, was 18mm. (I also tried with a fisheye 8mm lens. The wide angle photo above is with the fish-eye lens)
  • Set the shutter speed to around 10 seconds.
  • Change the camera to timer mode(2 or 10 seconds) or use a remote control so the shake due to pressing of Shutter Release button is minimized.
  • Place the camera on the Tripod and start shooting. If you are not getting good many stars, either increase ISO, reduce f (aperture value) or show down the shutter speed to 12, 15, 20 seconds.
Trial and Error will help you get better photos.